Wednesday, March 13, 2013

Parnevu Hair Products Review!

NPR review!

I was sent these products a few months ago, and I have been using them for about 2 months now.

First of all let me talk about my scalp problems.  I have severe dermatitis on my scalp.  Like...it's embarrassing because whenever I would go in public I would be super self conscious.  (You see people scratching their head, you think EEK LICE!)  No lice here though guys.  I even would treat myself for lice before I knew what was wrong with me.  I would treat for lice, and comb through my hair searching for an answer to my misery.

I've used and Head and Shoulders, and Selsum.  Nothing.  I had just given up and decided I would just have to scratch the heck out of my head for the rest of my life.  And then I saw an opportunity to try these products out.  I had no idea how they would change my life.

    I asked for 

T-Tree Oil Sheen


    Extra-Dry Salon Shampoo


     Extra-Dry After Shampoo Conditioner


Dear Pantene, Treseme,  and Aussie, we are never ever ever ever getting back together.

Since using these products my scalp itch is almost 100% gone.  I'll have a bad day with it here and there, but majority of the time I never even itch!

I'll never forget taking a shower the first time using the shampoo and conditioner.  It wasn't until later in the day while I was making dinner I realized "OMG I'M NOT SCRATCHING MY HEAD!"  I literally cried tears of joy.  You guys have no idea how miserable I was. =(


As for my hair quality?  I have always had decent hair, but I've dyed it 10439804753 times.  The formula kept my hair nice and soft.


So do I recommend this item?  ABSOLUTELY.  I cannot thank Parnevu enough for making these products.  They saved my sanity.


Tuesday, March 5, 2013

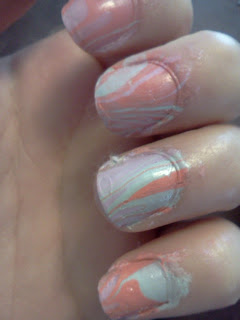
Water Marbling Tutorial With Tips and Tricks

Water marbling!  Okay...so I'm definitely not the best at this technique, but I figured I'd share with you guys how I do it, what I use, and some little tips.


I use: Any choice of two or three nail colors (*tip, Cremes work best.  Sheerer polishes give WAY less coverage.  Also I don't recommend trying to use glitters.  You can always spice up your mani at the end.) Chapstick (no, not for your luscious lips), something to remove polish, something to drag the polish together in the water (I used an old nail file.  you can use literally like...anything pointy.)  Qtips(not shown.  oops.) and a baby medicine cup.  If you have super long nails you can use a cheap shot glass.  Shown down below!

I don't recommend drinking while doing this.  bahaha.


 Step 1: Put chapstick around your nails (NOT ON THEM!) and on the backside of your finger.  This way after you put your finger in the water marble it's WAY easier to get off.


Steps 2&3:  Fill up your medicine cup (or shot glass) with lukewarm water.  Cold water actually makes the polish dry faster!  Then drop two drops of your first color into the water. 


Step 4:  Continue adding your colors.  If you're just starting out I recommend trying two, but three never hurt anything right!


Step 5:  From the outside edge in, use your item of choice (I used that old nail file of mine).  So take the outside polish and pull it in towards the middle as many times as you want!


Step 6:  Find the part of the design that you like, and place your finger in the polish.  The polish in front of your nail will adhere to the nail as you put your finger in.  Repeat this on all of your nails!

Step 7: BEFORE YOU TAKE THE NAIL OUT OF THE WATER, blow on the surface of the water.  This will help the remaining polish on the surface to dry.  Once the polish starts to look "plasticy" as you blow on it, use your dragging tool (I used my nail file) and pull away the polish from the front of your finger.  This will give your nail just clear water to come up out of when you pull it out of the water.

*tip: Don't worry about any little water bubbles that might appear on your nail, just blow on your nail hard and the should roll away.


  Pre - Cleanup


Step 7:  Using a bunch of qtips, clean up around your nails, and behind your nails.  All the places that polish is at except your nails!


So...you can either put a top coat on, or move on to the next step!

Step 8:  Get a dotting tool and one (or two) of the polishes you used for the water marble, and place some dots in the direction of the curves in your watermarble.


Once you're done, put your topcoat on and seal everything in!


*Polishes used: All Julep:  Teri, Simone, and Shenae.